| How to pack samples for shipping
Structural geologists take big samples and heavy samples and often they are quite fragile.
This page illustrates my preferred method for packing samples for shipping. It was developed
to get samples home from Namibia by sea freight which I imagined could be quite rough. After
some bad experiences with heavy rocks from Alaska which bashed about and broke their boxes,
I became convinced that any minimalistic approach to sample packing is a false economy.
Field work is very expensive, geologists' time is valuable, and many samples are irreplaceable.
Here is the way I ask my students to pack their samples for the best preservation of delicate
features and fabrics. Photos were taken by Tim Sherry (MS 2014) in the visitor flat of the
geology department at the University of Cape Town, preparing to return to Montreal.
This takes rather a long time, and needs overnight to cure. Do not attempt to
do this at the last minute. If there is not enough time for foam to cure,
just buy some bubble wrap, do not use spray foam.
Materials
- Permanent markers and/or paint pens for marking samples and the buckets.
- Black trash bags. Only black trash bags (polyethelene) so far have been shown to peel
cleanly from the spray foam insulation. Some other types of bags, particularly low quality shopping
bags, actually dissolve in the spray foam. I cannot emphasize enough how terrible it is when your
sample bag dissolves so definitely you must get the black trash bags. Heavy-duty
black trash bags preferred.
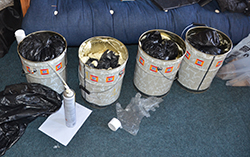
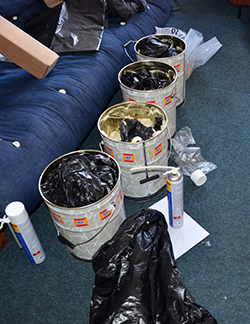
- Heavy duty 20-L (5-gal) buckets. Steel buckets like the ones pictured here from
Neo Paints in Windhoek are absolutely preferred. If you can't get these, heavy plastic paint buckets
with very secure sealed locking lids are appropriate. Many hardware stores sell cheaper light-duty buckets
which crack easily, with handles that can't take the weight of rocks, do not economize on cheap
buckets. The lid should be very difficult to remove, else it will pop off if the bucket gets compressed.
- Aerosol cans of spray foam insulation. The usual brand is "Great Stuff" and it comes in several
different flavors. Gap filler for wide gaps is probably the best (expands the most). The window and door
formula is less forceful when it expands (as not to deform windows and door frames). One regular can does
about one and a half buckets (depending on sample size and packing density). The tall can usually does
two buckets.
- Suggested: Latex gloves for the spraying/packing step - the
foam is very very sticky and hard to remove from your skin, don't touch it.
- Duct tape or fibre shipping tape. Even with a robust snap-on lid, if the bucket gets squeezed
there is a risk of popping the lid off. Tape should contain fibres for low stretch and high tensile
strength. Test that the tape is strong, cheap knock-off tape is sold in many places and can look
similar to good quality tape.
- Scale for weighing buckets if possible. If there is no scale, fill one bucket with water to use as a
reference. One 5-gallon / 20-liter bucket full of water weighs about 44 lbs / 20 kg. So, you can make
sure your buckets feel similar in weight to a full bucket of water. Rocks are roughly 2.5-3x as heavy
as water so that means you should be aiming for something like 60-70% porosity in the bucket. Consider
this ratio when estimating how many buckets you need to buy.
Steps for Packing
- Trim any excessively large rocks using hammer or saw.
- Confirm that sample labels including name and orientation marks are secure on each sample.
Write over any permanent marker and put a piece of rite-in-rain paper with redundant label
into each sample package.
- Photograph each sample with markings visible. Especially useful if samples break during
shipping (or to reconstruct orientation once you start cutting it up).
- Find a dry, well-ventilated place to work where you can lay out all the samples and buckets.
- Cut up the black trash bags into large sheets and individually wrap every sample completely. Don't
skimp on plastic, make sure there are no gaps where the sample is exposed. Wrapping thickly/
multiple layers will also help pad the samples against each other. Use scraps of paper to label the
outside of the black plastic packaging so that you can construct a packing list for each bucket.
- If you plan to take your buckets as extra luggage on the plane, they must be
under 23 kg / 50 lbs or extra weight fees will be incurred. If you don't have a scale, one 5-gallon /
20-liter bucket full of water weighs about 44 lbs / 20 kg. So, you can make sure your buckets feel
similar in weight to a full bucket of water. If you are shipping multiple buckets on a pallet the specific
weight of each bucket is less important but if they get much heavier than 20 kg they become difficult
to handle.
- Line each bucket with a black trash bag. Starting with the biggest samples, distribute the rocks
between the buckets. Rocks which have a long dimension greater than the diameter of the base of the
buckets have to be balanced upright with smaller rocks packed around them. Rocks which are close to
the height of the bucket may already be in the 20 kg range and may need to be packed in their own bucket
without many other samples. Confirm that all the samples fit into the buckets you have and redistribute
rocks to keep weight balanced between the buckets. When the samples have all been distributed, unpack
each bucket, keeping the samples together. Record all sample names on a packing list for each bucket.
- Pad the bottom of each bucket with an extra crumpled up black bag if you are putting a large sample
in the bottom. Place samples to cover the bottom of the bucket. Jigsaw the samples as best as possible
so they won't move. Do this in all the buckets, just one layer of rocks.
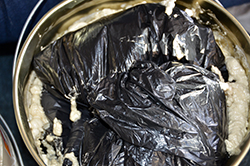
- Following the instructions on the insulation can, shake well. Screw the long thin tube to the jet on the
insulation can. The insulation requires air to cure, so just fill the spaces in between the first layer
of rocks in each bucket. Wait about 10-15 minutes. If there are big voids you don't need to fill them
in completely, just try to apply to the contacts between samples to sort of glue them together.
DO NOT TOUCH THE FOAM AS IT IS CURING -- or touch any uncured foam that fails
to cure -- it requires acetone or something similar to remove from your skin!
Tim Sherry suggests Latex gloves for the spraying/packing step.
- After 10-15 min the foam will still be soft but in theory the reaction to cure it should be well
along. Add the second layer of samples to each bucket, taking care to interlock them. Avoid touching the
foam with your hands, it is really sticky and hard to wash off. When all the second layer samples
are in place, apply a second round of spray foam insulation.
- Wait 10-15 min again and repeat for a third layer if you still have more rocks to pack. Leave at
least 1-2 inches of clearance below the top of the buckets as some types of lids sit down inside.
- After the previous round of spray foam begins to cure, do a final round on top of the samples and
around the edges. Don't worry if it foams up above the top of the bucket.
- Leave buckets overnight in a warm dry place where nobody is breathing the fumes from the spray foam.
- In the morning, everything should be cured. Cut or rip off any bits of foam that stick up and prevent
the lid from being firmly shut. Press the lids down onto the buckets to lock (real paint bucket lids
should be water-tight so will be quite hard to pry off once they are pushed down firmly).
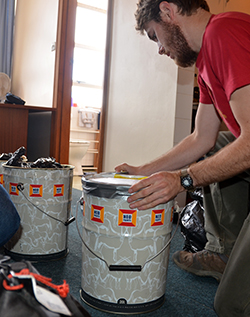
- Place a copy of the packing list inside each bucket and label the outside of the buckets and the lid
with your name, Department address, and packing list number or reference.
- Securely tape around the edge of the lid and then several rounds over the lid and under the
bottom of the bucket to prevent it popping off if the bucket is squeezed during shipping. Some shippers
will also apply straps.
- Your buckets are ready to ship!
|

Sample completely wrapped and padded with black plastic bags
Alternatively packing a layer of rocks and filling pore space
Stepwise packing
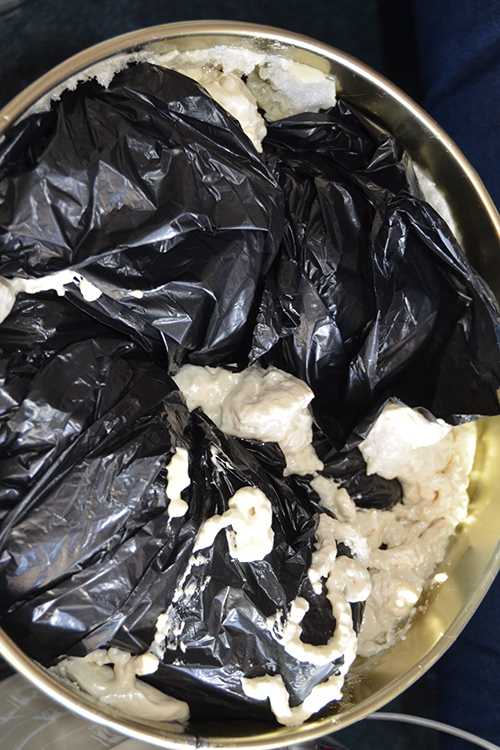
Packed bucket with foam curing
Foam is cured, ready to close bucket
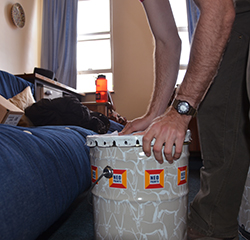
Once foam has cured, attach lid firmly
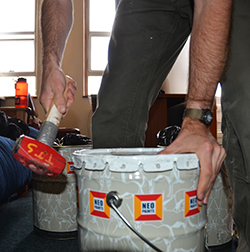
Steel bucket lids have tabs that are hammered into
the bucket sides to secure
Tim tapes the buckets with duct tape
|
